Laser engravers have revolutionised home workshops and small businesses, making it easy to cut and etch designs with precision. But with great laser power comes great responsibility – even hobby-grade machines can pose serious risks to your eyes and skin if used unsafely. In this article, we’ll explain why laser exposure is dangerous, what protective goggles or enclosures you need for diode, CO₂, and fiber lasers, and how to avoid hidden hazards like reflections. Real-world analogies and examples will help illustrate why even small lasers can cause permanent damage, and we’ll wrap up with a “Lil Bit Technical” section on laser classes, wavelengths, and beam differences. Let’s keep your maker journey both creative and safe!
Why Are Lasers Dangerous to Eyes and Skin?
Laser beams are essentially highly concentrated light – so intense that they can cut wood, engrave metal, and unfortunately, irreversibly damage human tissue in an instant. Our eyes are especially vulnerable, but skin can be injured too. Understanding these dangers is the first step in preventing them.
Eye Hazards: How Lasers Can Damage Vision
Your eye works like a lens focusing light on the retina. A laser’s tight, collimated beam means almost all its energy can be focused into a tiny spot on your retina, delivering intense power to a very small area[1]. In fact, a 1 milliwatt laser pointer focused by the eye can be brighter on the retina than looking at the sun’s surface, which is enough to cause retinal injury if the beam stays for a few seconds[2]. Now consider that many hobbyist engravers use 1,000–10,000 milliwatts (1–10 W)! Even a momentary hit from those can burn your eye faster than your blink reflex can react[3]. Laser radiation, even in small doses, can cause severe and permanent eye damage[4]. Unlike a burn on your skin, a burn on the retina leaves a permanent blind spot because retinal nerve cells don’t regenerate.
One real-world example: a hobbyist working with a “small” 1 W blue laser suffered a direct beam hit to the eye for about one second. There was no pain (the retina has no pain nerves), but it created a dark blur in the center of vision and required surgery[5]. Afterwards, the user was left with a permanent small blind spot off-center in that eye[6]. He later acknowledged that not wearing proper laser goggles for a >5 mW laser was a grave mistake[7]. The lesson is clear – never look directly into a laser beam or its specular reflection, even briefly[8][9]. You won’t get a second chance if it hits your eye.
Importantly, laser eye injuries aren’t limited to direct hits. Reflected laser light can also damage your vision. A mirror-like (specular) reflection can bounce most of the beam’s power right into someone’s eyes – sometimes over 80% of the original power is reflected[10]. Even a diffuse reflection (the scattered light from a matte surface) can be dangerous at close range with high-power lasers[11]. The bright “dot” shining off a piece of wood or metal may look harmless, but staring at the laser spot from a powerful Class 4 laser up close can cause eye injury within a few feet[11]. In short, your eyes have no defense against a laser’s intensity. You must provide that defense with proper safety measures (more on those soon).
Skin Hazards: Burns and Other Risks
Compared to eyes, your skin is tougher but still no match for a concentrated laser beam. High-power lasers can heat, burn, or even carbonize skin tissue instantly. A Class 4 laser (the category most hobby engravers fall into) “can burn the skin” on contact[12], especially if the beam is focused or you have dark, absorbent pigment on your skin (dark colors absorb more laser energy[13]). Even a 5 W blue diode laser – considered “low power” by some hobbyists – will light a match or cut tape, so imagine the burn it can inflict on your finger. Users have reported first-degree burns or worse from momentary contact with a laser beam. Never test a laser on your skin, and keep hands, fingers, and any body part well out of the beam path.
Indirect skin exposure is less likely to cause serious injury than eye exposure, but it’s not harmless. A scattered reflection could warm the skin or, with very powerful lasers, cause a small burn if you’re very close. More critically, a laser strong enough to engrave or cut material also poses a fire hazard – it can ignite flammable clothing or hair if mishandled[14][15]. Always secure long hair and avoid wearing highly flammable or reflective clothing/jewelry around an open-frame laser. In summary, treat the laser beam like an open flame or a red-hot tool – it will burn you if you or anyone else directly touches it, and you might not realize it until the damage is done.
Essential Protective Measures: Goggles and Enclosures for Each Laser Type
Staying safe with hobby lasers comes down to two main strategies: keep the beam contained and shield your eyes. That means using proper enclosures and laser safety goggles tailored to your laser’s wavelength. Let’s break down what you need for the three common types of desktop laser engravers:
- Diode Lasers (≈450 nm, blue/Violet): These are popular in DIY laser cutters and 3D printer add-ons, often in the 1–10 W range[16]. Diode lasers usually emit a visible blue (or violet) beam. Never let the visible light fool you – it’s extremely dangerous to eyes. Because they are often sold as open-frame modules, you must wear appropriate laser safety goggles whenever a diode laser is operating without an enclosure[17]. Use goggles rated to block around 400–450 nm (typically orange-tinted lenses) with a high optical density (OD) rating (OD 4+ is a good baseline). Many cheap diode laser kits include “free” safety glasses – be cautious with these. Tests have shown some included glasses only provided a dismal OD<2 protection at 450 nm, giving a false sense of security[18]. It’s worth investing in certified goggles from a reputable supplier. Additionally, consider building or buying an enclosure for your diode laser. A simple box or enclosure with an appropriate viewing window filter can turn a dangerous Class 4 open laser into a much safer system. If you have an enclosure, keep it closed whenever the laser is firing. Never stare directly at the engraving spot, even with goggles on, because goggles are a last line of defense. Good practice is to position diode lasers at or below eye level and keep your head above the beam plane[9].
- CO₂ Lasers (10,600 nm, far-infrared): CO₂ laser cutters (such as 40–60 W hobby machines) emit an invisible infrared beam. Most CO₂ machines come with a sturdy enclosure or case – and you should always operate them with the lid closed and interlocks enabled. The good news is that common enclosure materials like acrylic or polycarbonate effectively absorb 10.6 μm IR; in fact, the colored acrylic window on many CO₂ laser lids will absorb any stray CO₂ laser beam[19]. This means if the machine is properly closed, the risk of eye or skin exposure is eliminated[20]. However, the moment you open that lid or bypass the interlock (for example, to align mirrors or focus the beam), you’re exposing yourself to a Class 4 hazard. When aligning or working with an open CO₂ laser, wear specialized CO₂ laser safety goggles designed for far-IR (these often look like plain clear goggles but are made of materials that absorb IR). Remember that the CO₂ beam is invisible – you won’t know where it is just by looking, and there’s no blink reflex to protect you[21]. It’s easy to get complacent and do something you shouldn’t, like reaching in while the laser is firing or forgetting about a reflective object in the bed. Treat an open CO₂ laser like a loaded firearm: double-check it’s “safe” (laser off) before putting your hands in the area. Also, be aware that some materials (e.g. shiny metals or mirrors) can reflect the CO₂ beam. If your machine has a reflective metal bed or you’re engraving something like a mirror, keep the cover closed – those reflections can bounce around unpredictably. In summary: rely on the enclosure as the primary safety, and use proper eyewear + extreme caution for any open-beam maintenance.
- Fiber Lasers (1064 nm, near-infrared): Fiber lasers (commonly 20–50 W for marking metals and plastics) also emit an invisible beam, in the near-IR range. Unlike CO₂, a 1064 nm laser will penetrate into the eye and can directly damage the retina – and because it’s invisible, you won’t even know you’ve been hit until the damage is done[22]. Fiber lasers are often sold as desktop marking machines; many come with enclosures or cabinets, but some hobby units might be open-style. If your fiber laser is open-beam, you absolutely need OD6+ rated goggles for ~1064 nm (usually a reddish-orange or green lens) and ideally side shields, since this wavelength can reflect off surfaces. Keep in mind that marking lasers often work by rapidly pulsing the beam – the peak power can be extremely high even if average power is “only” 20 W. This means the beam can cause instant ablation of metals and specular reflections from metallic surfaces are a huge concern. Always remove or cover any shiny metal objects (watches, rings, tools) near the work area to avoid stray reflections[9]. It’s wise to enclose a fiber laser or use barriers (like certified laser safety curtains or panels) around it. Many fiber systems include a visible red laser pointer for alignment – don’t assume the machine is safe just because you only see a weak red dot. The real 1064 nm beam is invisible and far more powerful. As with all lasers, keep others (and pets!) out of the room or behind protective barriers when the laser is in use. Bystanders should not look at the process without proper protection. Fiber lasers are arguably the most hazardous of the three types for eyes because of their invisibility and power, so take them very seriously.
Bottom line: for every laser type, use the correct eyewear and engineering controls. Laser safety glasses are the first line of defense against eye injury, and they come in different filter wavelengths and ratings to match your laser[23]. Make sure your goggles explicitly cover the wavelength of your laser (450 nm, 1064 nm, 10,600 nm, etc.) and are rated for the power and class of your laser. Likewise, whenever possible, enclose the laser or use shielding – a Class 4 laser can be reduced to a much safer Class 1 product if it’s completely enclosed with proper interlocks[20][24]. This is why many commercial laser cutters (e.g. Glowforge or industrial systems) are sold as fully enclosed units. If you’ve built or bought an open-frame laser, consider adding your own enclosure or at minimum, side shields and a top cover with appropriate laser filter panels. By containing the beam and wearing proper goggles, you greatly reduce the risk of an accident.
Even Low-Power Lasers Can Cause Permanent Damage
It’s a dangerous myth to think “It’s just a low-power laser, it can’t hurt me.” In laser terms, “low power” is very relative. The typical laser pointer that’s deemed relatively safe for brief use is under 5 mW (milliwatts). Many desktop diode lasers are 1,000–5,000 mW (1–5 W), which is 200–1000 times more powerful than a pointer. There’s a reason regulators cap pointer power: even a few milliwatts can be hazardous if misused. At powers above about 10–20 mW, an accidental eye exposure at close range can cause retinal injury faster than you can blink or look away[3]. And as power goes up, the risk goes up exponentially. Blinking or averting your eyes is not a reliable defense once you’re dealing with lasers tens of milliwatts and beyond[3].
Another way to think about it: if your laser engraver can cut or burn any material (even just black paper), it’s powerful enough to burn your retina or skin. Our bodies don’t regenerate retinal cells, so even a tiny burn can leave a blind spot. You wouldn’t stare into a welding arc or the sun, and those are broad-spectrum light sources; a laser is even more concentrated and often invisible. One analogy often cited by experts: a 1 mW laser hitting the eye is like an intense sunbeam – and higher-power lasers are like having a mini sun or welding arc shot directly into your eye[2]. The energy is delivered so fast and in such a focused way that it overwhelms and destroys tissue in microseconds.
It’s also worth noting that invisible lasers can be more insidious. With a visible beam (like a blue diode), at least you might have a chance to see the bright flash and blink or turn away (though damage may still occur). With an IR laser (fiber or CO₂), you get no warning at all – the beam could be injuring your eye and you wouldn’t realize until afterwards. This is why even a so-called “small” laser demands the same respect as an industrial one. In fact, all the lasers we’re discussing (diode, CO₂, fiber) are categorized as Class 4 if they’re above 500 mW and not fully enclosed[25]. Class 4 is the highest danger class, meaning even diffuse reflections are potentially unsafe and skin injuries or fires are possible[25][14]. Treat your desktop laser like a powerful tool – because it is one. The size or wattage doesn’t change the need for precautions. A 2 W laser can blind you just as permanently as a 100 W laser, the only difference is how large an area it can burn or how quickly it happens (and both are far too fast to risk).
If you need further convincing, recall the earlier example of the hobbyist injured by a 1 W laser – that’s considered a pretty modest power by today’s hobby standards, yet one accidental moment changed his vision for life[6]. Numerous reports exist of people getting retinal damage from lasers in the tens or hundreds of milliwatts as well[26]. The takeaway: don’t underestimate “small” lasers. Always use proper safety measures no matter how low the power seems. It only takes one unprotected exposure to do irreversible harm.
Reflections: Hidden Hazards of Indirect Laser Exposure
It’s not just the direct beam you have to avoid – reflections can bite you too. Laser light reflects in two ways: specular reflections (like a mirror) which preserve the beam’s strength and direction, and diffuse reflections (from matte or uneven surfaces) which scatter the beam. Both can be dangerous in different scenarios:
- Specular reflections are just as dangerous as the direct beam in many cases[27]. If your laser hits a mirror, shiny metal, or even a piece of glass at the right angle, it can send a nearly fully powered beam right toward your eye. Think of a specular reflection as a second laser beam being created from the first. For example, a CO₂ laser hitting a mirror could reflect ~80–100% of its power; a blue diode laser hitting a polished metal can reflect a large portion of its power as well[10]. This is why you should remove or cover any reflective surfaces in or near the laser’s path[9]. That includes mirrors on walls, glass frames, glossy tools, and even jewelry you’re wearing. Many laser operators take off watches or rings when working with open lasers, because a flick of the wrist with a reflective watch face could send a beam right into your eyes. Also, be very cautious when attempting to engrave reflective metals – some diode and fiber lasers can mark metals, but if not done carefully, the metal can reflect the beam. It’s often recommended to coat reflective metals with paint or tape (or use a marking spray) to reduce reflectivity when using hobby lasers.
- Diffuse reflections scatter the beam in many directions, so they are less concentrated than the original beam. Usually, a diffuse reflection from a low-power laser (e.g. the red dot of a laser pointer on a wall) is not harmful unless you stare at it from very close up for a long time. However, with Class 4 lasers, even diffuse reflections can be hazardous at short distances[11]. The intensity of a scattered laser “dot” can still exceed safe limits if you’re within a few feet for a multi-watt laser[11]. For instance, the bright burning spot on wood or the glowing part of acrylic being cut is sending out diffuse laser and plasma light – it’s wise not to stare directly at that either. Avoid placing your face near the cutting area to “watch the action” – use a camera or mirrors at an angle if you want a close view, or better yet, watch through appropriate laser-rated acrylic shields. As a rule of thumb, if you’re close enough that the spot appears uncomfortably bright, look away or use protective filters. It’s not worth risking your vision.
To stay safe from reflections: always know where your beam is going and what it might hit[28]. Enclose the beam path as much as possible (for example, many CO₂ lasers have beam guards or bellows around the mirrors). Keep your head above the plane of the beam – most engraving happens on a horizontal plane, so there’s no reason your eyes should ever be level with the beam path[9]. If working with an open laser, a good habit is to crouch or position yourself such that if a reflection occurs, it would go under or hit your torso, not your face (and of course, still wear your goggles). Use matte, non-reflective fixtures in your laser setup. For example, honeycomb beds or black anodized aluminum spoilboards are better than shiny metal surfaces. Never put a mirror or glass item in the laser without understanding the risks – if you do engrave glass or mirrored acrylic, realize that some portion of the laser will reflect. In short: treat reflections with the same caution as the beam itself. As laser safety experts say, “what you can’t see can hurt you” – invisible or unexpected reflections are a common cause of accidents[29].
(Real-world analogy: Imagine the laser beam is a super-bright flashlight – shining it directly in your eyes is like blinding yourself, but even shining it at a mirror or glossy surface can send that blinding light right back at you. Always be aware of any “bounce” paths the light can take.)
“Lil Bit Technical” – Laser Classes, Wavelengths, and Beam Basics
In this section, we’ll dive into a bit more technical detail on how lasers are classified and why certain wavelengths and beam properties influence the type of damage they can do. This knowledge isn’t just trivia – it helps you understand why the safety guidelines above are so important.
Laser Classification (Class 1–4)
Lasers are grouped into classes based on their potential hazard to people. The system ranges from Class 1 (least dangerous) up to Class 4 (most dangerous)[30]. Here’s a quick rundown:
- Class 1: Safe during normal use. Either the laser’s output is so low that it’s not harmful, or the laser is fully enclosed so no hazardous beam is accessible[24]. Examples: Laser printers, DVD/Blu-ray players, and well-designed laser cutters that have an interlocked enclosure are Class 1 devices (because you can’t access the beam)[24].
- Class 2: Low-power visible lasers under 1 mW. These rely on the human blink reflex for safety – if the beam hits your eye, you’ll reflexively blink or turn away within 0.25 seconds, preventing injury[31]. They are generally not harmful to eyes if exposure is brief. Examples: barcode scanners or very low-power laser pointers (often labeled <1 mW)[31].
- Class 3R (IIIa): Visible lasers from 1 mW to 5 mW. These are slightly higher powered and can be dangerous if you deliberately stare into the beam, but an accidental or momentary exposure is still unlikely to cause permanent injury[32][33]. Many laser pointers fall into this category (green astronomy pointers, etc.). Direct viewing is not recommended, and they require a caution label.
- Class 3B: Lasers from 5 mW up to 500 mW. Now we are in hazardous territory. A Class 3B laser can cause immediate eye injury if the beam or a specular reflection hits the eye[34]. However, diffuse reflections from Class 3B lasers are generally not harmful (you shouldn’t stare at the dot up close, but the scattered light from a wall at a normal distance isn’t likely to blind you). Many lab lasers and older-generation DIY lasers (like 100 mW, 200 mW etc.) are Class 3B. These require warning labels and some safety measures, but not as strict as Class 4.
- Class 4: Lasers above 500 mW (0.5 W). This is the highest class, and it covers virtually all hobbyist engraving/cutting lasers today[25]. Class 4 lasers can cause eye damage even from diffuse reflections[25], and they can burn skin or ignite materials. There is no safe exposure to a Class 4 laser – any direct or reflected beam to the eye can be devastating. By law, Class 4 devices must have a warning label and usually features like a key switch and safety interlocks are recommended/required[25]. Examples: A “5 W” diode laser module, a 40 W CO₂ laser tube, or a 20 W fiber laser are all Class 4. Even if the product is sold as a machine with shields, the laser source itself is Class 4. (Many consumer laser cutters are technically Class 4 lasers housed in a way to make the machine operate at Class 1 safety – but if you bypass the enclosure, you’re exposing a Class 4 beam[35].)
In summary, Class 4 = extreme caution. Treat any laser engraver/cutter as Class 4 unless you are absolutely sure it’s otherwise. And if it’s Class 4, remember that all exposures (direct or indirect) are dangerous. This classification also explains why we stress enclosures: an enclosed Class 4 laser with proper interlocks can be used more like a Class 1 safely[24][20]. But as soon as you defeat those safeties, you’re back to Class 4 risk.
Wavelength Matters: Retina vs. Cornea, and “Invisible” Dangers
Not all lasers injure the eye in the same way. It depends on the wavelength (color) of the laser, because different wavelengths interact with eye tissues differently:
- Visible light (400–700 nm) and near-infrared (700–1400 nm) – These wavelengths are often called the “retinal hazard region” because the eye’s lens will focus them onto the retina. Both diode lasers (~450 nm blue) and fiber lasers (1064 nm IR) fall in this category. The retina is extremely sensitive and easily damaged by concentrated light. Wavelengths around blue and green (400–550 nm) can also cause photochemical damage over time (similar to how UV causes sun damage), while the near-IR causes purely thermal burns on the retina. Either way, lasers in this range pose the worst permanent eye damage risk[22]. They essentially burn spots on the retina, leading to blind spots or loss of vision. Unfortunately, our eyes don’t have pain sensors in the retina, so these injuries can be painless but permanent – you only notice when part of your vision is gone or blurred.
- Far-infrared (above ~1400 nm) – This is where CO₂ lasers operate (10,600 nm is well into the far IR). These wavelengths do not penetrate to the retina because water in the cornea and lens absorbs them strongly[22]. That means a CO₂ beam won’t typically give you a retinal burn or blind spot. However, it will cause a burn on the surface of the eye (cornea) almost instantly, which is essentially an extreme form of “corneal flash burn.” It’s like a very intense hot spark hitting your eye’s surface. This can cause severe pain, corneal clouding, or even permanent scarring on the cornea. In some cases, it might lead to cataracts (damage to the lens) as well[22]. The good news (if any) is that corneal injuries can sometimes heal or be treated (in serious cases with surgery), whereas retinal damage is irreparable. But you definitely don’t want to find out first-hand – a corneal burn from a CO₂ laser can be devastating and may still cause partial vision loss.
- Ultraviolet (below 400 nm) – Though not a focus of this article (since hobby engravers aren’t usually UV lasers), it’s worth noting UV lasers (e.g. 355 nm UV marking lasers) come with their own risks. UV is mostly absorbed in the cornea and lens as well, and can cause photokeratitis (a kind of sunburn on the cornea) and can contribute to cataract formation in the lens[22]. UV lasers can also cause skin erythema (sunburn) and even increase long-term risk of skin cancer if exposure is repeated. So if anyone ever deals with a UV laser, know that just because it’s invisible doesn’t mean it’s safe – wear proper UV-blocking goggles and cover your skin.
For the lasers in our discussion: 450 nm (blue) will primarily threaten the retina, 1064 nm (IR) will also reach the retina, and 10,600 nm (CO₂ IR) will damage cornea/skin but not retina[22]. This is why the type of goggles and windows you use must be tailored to the wavelength – for instance, an orange polycarbonate shield that blocks blue light is great for diode lasers, but it would be useless for a CO₂ laser (which needs an IR-blocking window). Conversely, the transparent orange acrylic on a CO₂ laser lid is great for blocking 10,600 nm IR, but it lets visible light through – so it would not protect your eyes from a 450 nm laser. Always verify that your safety equipment is rated for the specific wavelength of your laser.
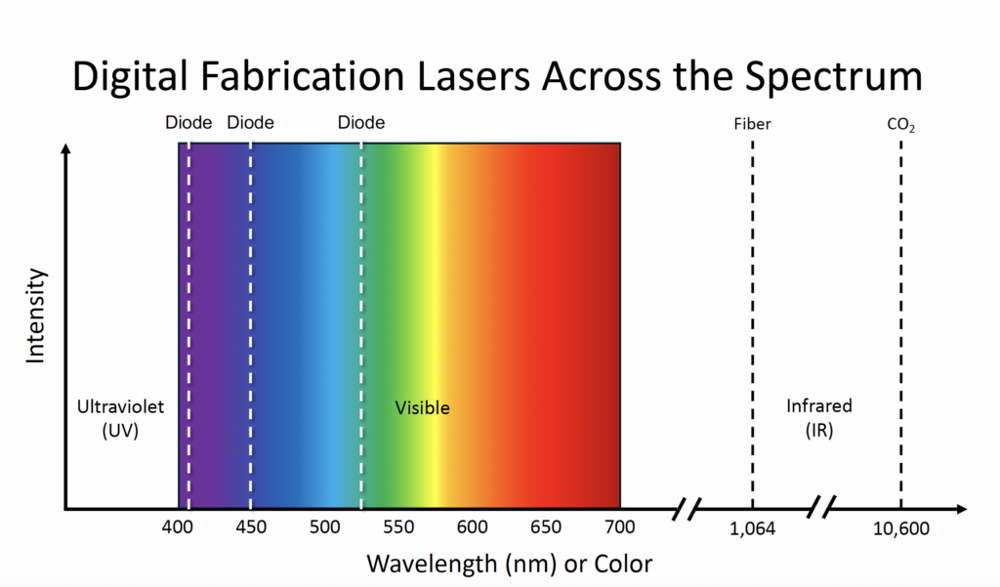
Figure: Common hobby laser wavelengths span from visible light to far infrared. Blue-violet diode lasers (~405–450 nm), near-IR fiber lasers (~1,064 nm), and far-IR CO₂ lasers (~10,600 nm) occupy different parts of the electromagnetic spectrum[36][37]. Each wavelength interacts differently with eye tissues, which is why the required eye protection and enclosure materials differ.
Beam Intensity, Focus, and Why Distance Matters
Another technical aspect of lasers is how the beam’s power is delivered. A key concept is power density – power per unit area. A 5 W laser spread over a wide area might not burn anything, but focused to a pinpoint, that 5 W can have a power density high enough to cut steel. Lasers are dangerous because they are both collimated (not spreading out much over distance) and often focused by lenses to very small spots:
- Collimation and distance: A well-collimated laser beam remains tightly concentrated over long distances. For example, a typical 1 W laser with a beam divergence of ~1 milliradian has a Nominal Ocular Hazard Distance (NOHD) on the order of hundreds of feet – one source calculates about 225 m (740 ft) hazard distance for a 1 W laser under certain assumptions[38]. That means if someone’s eye is within 225 m of the laser and in the beam path, it can cause injury. For a 5 W laser, the hazard distance extends roughly to 500 m or more[38]. This is why you sometimes hear about lasers being dangerous to pilots in aircraft – high-powered beams can travel far before they diffuse. In a small workshop, this simply means distance won’t save you – you can’t assume you’re safe just by standing a couple meters away if the beam can reach you or a reflective surface near you. Always operate lasers in a controlled area where you know no one is unintentionally in line with the beam or its reflections.
- Focus and focal points: Most laser engravers use a lens to focus the beam to a tiny spot on the workpiece. This is what creates the intense cutting/engraving power. At the focal point, the power density of the laser is extremely high – often thousands or millions of watts per square centimeter. That’s why it can vaporize wood or metal at that tiny point. The flip side is that anything that intersects that focused beam (like your finger or an eye) will be exposed to that same power density. Think of a magnifying glass focusing sunlight to a point that can start a fire – the laser’s lens is doing that with much more powerful light. You should never place anything (especially body parts) at the focal distance from the laser output when it’s on. Even outside the exact focus, within a few inches the beam is still quite concentrated. On the other hand, beyond the focus, the beam expands (like how a flashlight beam spreads out). This is why a laser cutting at a specific focus can burn, but a wall several meters away gets a larger, weaker spot. However, as mentioned, with high powers the spot might still be dangerous far away. The key safety tip here: use the proper focus for cutting, but defocus the beam or turn off the laser when moving or when no material is present. Many accidents happen during alignment or when the laser is “on” but not aimed at a material – a stray focused spot can land on something you didn’t intend (like a hand or a plastic part). Some users intentionally defocus their laser slightly during certain operations to reduce risk of piercing a material and hitting something underneath. Know your laser’s focal length and keep anything sensitive (or reflective) away from that region.
- Beam profile differences: Diode lasers often have a rectangular or asymmetrical beam profile (due to the nature of laser diodes) and usually require a lens to focus into a smaller spot. Fiber lasers typically have very high beam quality (often a TEM00 mode) and can be focused to an extremely small spot, which is why they’re great for fine engraving – but that also means a fiber laser’s focal spot is intensely bright (even if we can’t see it in IR). CO₂ lasers have a longer wavelength and tend to have a slightly larger focused spot for a given lens compared to a visible laser, but at 40–50 W they make up for it in raw power. The practical difference for safety is minor – all can blind and burn – but note that fiber lasers, especially pulsed ones, can have almost instantaneous cutting power. With a pulsed fiber, the beam might only be “on” for a few nanoseconds at a time, but at extremely high peak power. This can make traditional measurement of power tricky; suffice to say, assume the worst-case when it comes to beam intensity.
In conclusion, understanding these technical points underscores why the earlier safety precautions are so vital. Lasers are unforgiving: they don’t dissipate like normal light, they can deliver energy over long distances, and they concentrate energy into tiny areas. But with proper shielding, eyewear, and respect for the beam, you can enjoy the amazing capabilities of your diode, CO₂, or fiber laser without sacrificing your vision or health. Stay safe, and happy making!
Safety Takeaways: Always wear the correct laser safety glasses for your machine’s wavelength, use enclosures or shields to contain the beam, never look directly at laser light (even the “harmless” looking reflections), keep bystanders out of the room (or behind proper protection), and treat your hobby laser with the same caution you would a powerful industrial tool. Remember, you only get one set of eyes and skin – protect them so you can keep on creating for years to come![39][40]
sources will automatically be displayed below
[1] [2] [3] [26] [32] Laser Pointer Safety – Don’t aim laser pointers at a person’s head and eyes
https://www.laserpointersafety.com/laser-hazards_head-eyes/laser-hazards_head-eyes.html
[4] [8] [9] [10] [18] [24] [25] [30] [31] [33] [34] [35] [36] [37] Laser Eye Safety in Digital Fabrication: Protecting Your Vision – Make:
[5] [6] [7] World: Hobbyist injures self with 1 watt blue laser | Laser Pointer Safety – News of non-aviation incidents, arrests, etc.
[11] [12] [13] [15] [28] [38] [40] Safety of Class 4 visible-beam lasers
https://www.lasersafetyfacts.com/4
[14] [17] [19] [20] [21] 13 Safety Tips When Using Co2 Laser Engraving Machine — Au.Monportlaser
[16] [39] Are Laser Engravers Dangerous? Safety Risks and Precautions
[22] [23] [27] Laser Safety Goggles – The First Line of Defense Against Eye Injury – Laser Safety Certification
[29] What You Can’t See Can Hurt You: Why Laser Glasses Are Crucial …